

Over 81% of people dream of writing a book, yet most never start because they believe they need expensive, complicated software. The truth? Microsoft Word—the program sitting on millions of computers worldwide—is perfectly capable of helping you write, format, and prepare your book for publication. Writing a Book in Word isn’t just possible; it’s practical, accessible, and used by countless successful authors.
Whether you’re crafting your first novel, penning a memoir, or developing a non-fiction guide, Word provides all the essential tools you need. This comprehensive guide will walk you through every step of the book-writing process, from initial setup to final formatting, proving that great books come from great ideas and consistent effort—not expensive software.
Key Takeaways
• Microsoft Word is fully capable of handling book-length manuscripts with proper setup and organization
• Proper formatting from the start saves hours of revision work and ensures professional results
• Built-in Word features like styles, navigation pane, and track changes streamline the writing and editing process
• Simple export options make it easy to prepare your manuscript for both digital and print publishing
• Consistent daily writing habits matter more than having perfect software tools
Can You Write a Book in Microsoft Word?
Absolutely—and you’re in excellent company. Many bestselling authors, including successful self-published writers, have used Microsoft Word to create their manuscripts. The software handles everything from short stories to epic fantasy novels spanning hundreds of pages.
Benefits of Writing a Book in Word
✅ Universal Accessibility: Nearly everyone has access to Microsoft Word, whether through Office 365, standalone purchase, or workplace licensing.
✅ Familiar Interface: No learning curve means you can start writing immediately instead of spending weeks mastering new software.
✅ Robust Formatting Tools: Word offers professional-grade formatting options including styles, headers, footers, and table of contents generation.
✅ Collaboration Features: Built-in commenting and track changes make it easy to work with editors, beta readers, or co-authors.
✅ Export Flexibility: Save as PDF for print publishing or DOCX for upload to self-publishing platforms.
Limitations to Consider
⚠️ Large Document Management: Files over 100,000 words can become sluggish, though this affects relatively few authors.
⚠️ Limited Organization Tools: Unlike specialized writing software, Word lacks advanced scene management or character tracking features.
⚠️ Distraction Potential: The full-featured interface can tempt writers to format instead of write during first drafts.
Despite these minor limitations, Word remains an excellent choice for most authors, especially those just starting their writing journey.
Setting Up Word for Book Writing Success
Proper setup prevents formatting headaches later. Before typing your first sentence, configure Word to handle book-length manuscripts professionally.
Document Setup Essentials
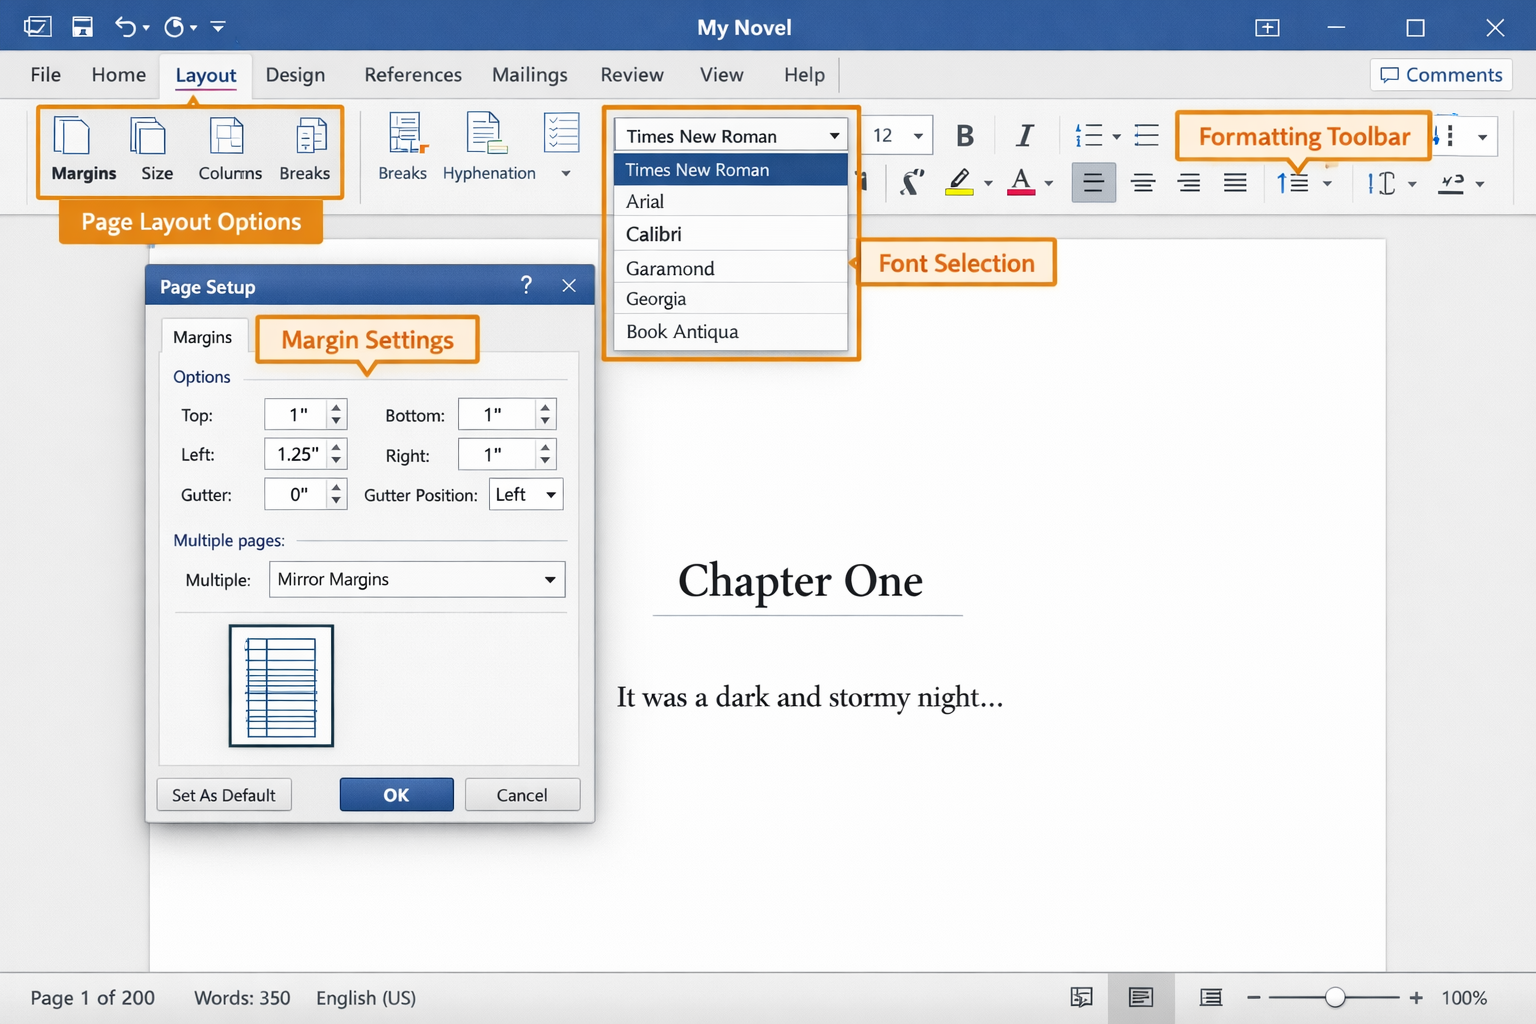
📄 Page Size and Margins
- Set page size to 8.5″ x 11″ for drafting (adjust later for publishing)
- Use 1-inch margins on all sides
- Access via Layout > Margins > Custom Margins
🔤 Font Selection
- Choose Times New Roman (11-12pt) or Garamond (11pt) for readability
- Avoid decorative fonts that strain eyes during long writing sessions
- Maintain consistency throughout your manuscript
📏 Line Spacing and Paragraphs
- Set line spacing to 1.15 or 1.5 for comfortable reading
- Configure paragraph spacing: 6pt after paragraphs
- Enable automatic hyphenation: Layout > Hyphenation > Automatic
Style Configuration
Create custom styles for consistency:
| Style Name | Font Size | Formatting | Use Case |
|---|---|---|---|
| Chapter Title | 18pt | Bold, Centered | Chapter headings |
| Scene Break | 14pt | Centered | Scene transitions |
| Body Text | 11-12pt | Left aligned | Main content |
| Dialogue | 11-12pt | Standard | Character speech |
Access styles through Home > Styles > Create a Style.
Structuring Your Book in Word
Organization prevents chaos. A well-structured document makes writing, editing, and formatting infinitely easier.
Essential Document Elements
📋 Front Matter Structure:
- Title Page
- Copyright Page
- Table of Contents
- Foreword/Preface (if applicable)
📖 Main Content:
- Chapter divisions using Heading 1 style
- Consistent chapter numbering
- Clear scene breaks within chapters
📄 Back Matter:
- Acknowledgments
- About the Author
- Bibliography/References (non-fiction)
Navigation Best Practices
Use Word’s Navigation Pane (View > Navigation Pane) to:
- Jump between chapters instantly
- Reorganize sections by dragging headings
- Track overall document structure
- Search for specific scenes or content
Insert Page Breaks Properly:
- Use Insert > Page Break (Ctrl+Enter)
- Never use multiple paragraph returns to start new pages
- Place page breaks before each new chapter
Step-by-Step: Writing Your Book in Word
Success comes from systematic approach. Follow these proven steps to transform your idea into a completed manuscript.
Step 1: Create Your Foundation
Start with a simple outline before writing. This doesn’t need to be elaborate—even basic bullet points help maintain direction.
Chapter Planning Method:
Chapter 1: Introduction to Main Character
• Establish setting and time period
• Introduce central conflict
• End with hook for Chapter 2

Chapter 2: Rising Action
• Develop secondary characters
• Escalate main conflict
• Plant seeds for later plot points
For detailed guidance on developing your initial concept, check out our complete guide to starting to write a book.
Step 2: Establish Writing Rhythm
Set realistic daily goals:
- Beginners: 250-500 words daily
- Experienced: 750-1,500 words daily
- Consistency beats intensity—write every day, even if briefly
Create distraction-free environment:
- Use Word’s Focus mode (View > Focus)
- Turn off internet notifications
- Set specific writing times
- Keep reference materials nearby
Step 3: Leverage Word’s Organization Features
Navigation Pane Benefits:
- See document outline at a glance
- Click headings to jump between chapters
- Drag and drop to reorganize sections
- Search across entire manuscript
Comments for Self-Notes:
- Insert > Comment (Ctrl+Alt+M)
- Mark areas needing research
- Note plot holes to address later
- Leave reminders for future editing
Find and Replace Power:
- Fix character name changes globally
- Replace placeholder text
- Standardize formatting inconsistencies
- Access via Home > Replace (Ctrl+H)
For writers looking to develop productive habits, explore our guide on critical elements in every productive writing plan.
Professional Formatting Techniques
Formatting transforms manuscripts into books. Master these techniques to create professional-looking results.
Styles: Your Formatting Foundation
Why Styles Matter:
- Ensure consistency across hundreds of pages
- Enable global formatting changes instantly
- Create automatic table of contents
- Prepare manuscript for professional publishing
Essential Style Setup:
Heading 1 (Chapter Titles):
- Font: Times New Roman, 18pt, Bold
- Alignment: Center
- Spacing: 18pt before, 12pt after
- Page break before: Yes
Normal (Body Text):
- Font: Times New Roman, 11pt
- Alignment: Left
- First line indent: 0.3″
- Spacing: 6pt after paragraph
Page Numbering and Headers
Professional Page Setup:
- Insert > Header & Footer > Page Number
- Choose bottom center or top right placement
- Start numbering after front matter
- Use different first page option for title pages
Header Configuration:
- Left page: Author Name
- Right page: Book Title
- Font: 10pt, italics
- Exclude from first page of chapters
Table of Contents Generation
Automatic TOC Creation:
- Apply Heading 1 style to all chapter titles
- Position cursor where TOC should appear
- References > Table of Contents > Automatic Table
- Update automatically as you add chapters
Editing and Proofreading in Word
Writing is rewriting. Word’s editing tools help polish your manuscript to professional standards.
Built-in Editing Tools
Spelling and Grammar Check:
- Review > Spelling & Grammar (F7)
- Right-click underlined words for suggestions
- Add custom words to dictionary
- Don’t rely solely on automated tools
Readability Statistics:
- File > Options > Proofing > Show readability statistics
- Aim for grade 7-9 reading level for most audiences
- Monitor average sentence length and passive voice usage
Advanced Editing Techniques
Track Changes for Revisions:
- Review > Track Changes
- See all edits highlighted in document
- Accept or reject changes individually
- Essential for working with editors
Read Aloud Feature:
- Review > Read Aloud
- Catches errors your eyes miss
- Identifies awkward sentence flow
- Helps evaluate dialogue naturalness
Document Comparison:
- Review > Compare > Compare Documents
- Identify changes between draft versions
- Merge feedback from multiple reviewers
- Maintain version control
For comprehensive editing strategies, consider reviewing our guide on common mistakes every writer should avoid.
Preparing Your Manuscript for Publishing
The final mile matters most. Proper export and formatting ensure your book looks professional across all platforms.
Export Options for Different Publishing Paths
PDF for Print Publishing:
- File > Export > Create PDF/XPS
- Use “Minimum size” for digital distribution
- Use “Standard” for print-quality files
- Embed fonts for consistent appearance
DOCX for Platform Upload:
- Save as .docx for Kindle Direct Publishing
- Maintain original formatting
- Include metadata (title, author, keywords)
- Keep file size reasonable for upload
Self-Publishing Format Requirements
eBook Preparation:
- Remove headers and footers
- Simplify formatting (minimal fonts, standard spacing)
- Ensure chapter breaks create new pages
- Test on multiple devices before publishing
Print Book Considerations:
- Adjust margins for binding (usually larger inner margins)
- Set proper page size (typically 6″ x 9″ for most genres)
- Include bleed areas if using images
- Verify page count meets minimum requirements
For authors ready to take the next step, our ultimate guide to self-publishing eBooks provides comprehensive publishing strategies.
Writing Efficiency Tips and Shortcuts
Speed comes from smart habits. These techniques help you write faster without sacrificing quality.
Essential Keyboard Shortcuts
| Shortcut | Function | Benefit |
|---|---|---|
| Ctrl+S | Save document | Prevent work loss |
| Ctrl+Z | Undo | Quick error correction |
| Ctrl+F | Find text | Locate specific content |
| Ctrl+H | Find and replace | Global text changes |
| F7 | Spell check | Quick proofreading |
| Ctrl+Enter | Page break | Proper chapter separation |
Productivity Strategies
Writing Session Structure:
- 5 minutes: Review previous day’s work
- 25 minutes: Focused writing (Pomodoro technique)
- 5 minutes: Quick notes for next session
- Repeat: 2-4 cycles per writing session
Backup and Version Control:
- Save to cloud storage (OneDrive, Google Drive, Dropbox)
- Create weekly backup copies with date stamps
- Use “Save As” for major revision milestones
- Email completed chapters to yourself as additional backup
Distraction Management:
- Write first, format later
- Use Word’s Focus mode for distraction-free writing
- Set phone to airplane mode during writing sessions
- Keep research materials in separate documents
Common Mistakes and How to Avoid Them
Prevention beats correction. Avoid these frequent pitfalls that derail book projects.
Formatting Mistakes
❌ Using Spaces Instead of Tabs
- Problem: Inconsistent alignment, formatting issues
- Solution: Use paragraph indentation settings
❌ Manual Page Breaks with Multiple Returns
- Problem: Formatting breaks when text is added/removed
- Solution: Insert proper page breaks (Ctrl+Enter)
❌ Inconsistent Styling
- Problem: Unprofessional appearance, difficult global changes
- Solution: Create and use custom styles consistently
Writing Process Mistakes
❌ Editing While Writing First Draft
- Problem: Kills creative flow, extends writing time
- Solution: Write first, edit later—resist perfectionism
❌ Not Backing Up Work
- Problem: Catastrophic loss of months of work
- Solution: Multiple backup methods, cloud storage
❌ Overcomplicating Early Drafts
- Problem: Focus on formatting instead of content
- Solution: Simple formatting until final draft
For additional writing guidance, explore our collection of tips for writing incredible non-fiction books.
Word vs. Specialized Writing Software
Choosing the right tool depends on your needs. Here’s when Word excels and when alternatives might help.
When Word Is Perfect
✅ First-time authors who want familiar, accessible tools
✅ Simple projects without complex research requirements
✅ Collaborative writing with editors using standard software
✅ Budget-conscious writers avoiding additional software costs
✅ Authors focused on writing rather than project management
When to Consider Alternatives
📝 Scrivener: Better for research-heavy projects, complex organization
📝 Google Docs: Superior real-time collaboration features
📝 Ulysses: Distraction-free writing with markdown support
📝 yWriter: Free alternative with scene-based organization
The Bottom Line: Word handles 90% of authors’ needs excellently. Specialized software offers marginal improvements for specific use cases, but shouldn’t delay starting your book.
Conclusion
Writing a Book in Word proves that successful authorship depends more on persistence than perfect tools. Microsoft Word provides everything needed to transform your ideas into a professionally formatted, publishable manuscript. From initial setup through final export, Word’s familiar interface and robust features support authors at every stage of the writing journey.
The key to success lies not in having the most advanced software, but in developing consistent writing habits and mastering the tools you already possess. Word’s accessibility removes barriers that prevent many aspiring authors from starting, while its professional formatting capabilities ensure your finished book meets industry standards.
Your Next Steps:
- Open Microsoft Word today and create your book document
- Set up proper formatting using the guidelines in this guide
- Write your first 500 words—even if they’re imperfect
- Establish a daily writing routine that fits your schedule
- Focus on completion over perfection in your first draft
Remember, every published author started with a blank page. Your story deserves to be told, and Word gives you everything needed to tell it professionally. The only thing standing between you and your finished book is the decision to begin.
For continued support on your writing journey, explore our comprehensive resources on planning a successful book launch to prepare for the exciting next phase of your authorship adventure.


